How to Fix a Leaky Pipe Under Your Sink: A Comprehensive Guide
Discovering a leak under your kitchen or bathroom sink can be a homeowner’s nightmare. The constant dripping, the potential for water damage, and the nagging feeling that you need to act quickly can be overwhelming. But don’t panic! Fixing a leaky pipe under the sink is often a manageable DIY project with the right tools, knowledge, and a bit of patience. This comprehensive guide will walk you through the process, from identifying the source of the leak to implementing effective repair strategies. We’ll provide you with the expert insights and practical steps needed to confidently tackle this common plumbing issue, saving you time, money, and the headache of calling a professional for a simple fix.
Understanding Common Causes of Leaky Pipes Under Sinks
Before diving into the repair process, it’s crucial to understand the common culprits behind those pesky leaks. Identifying the source will guide your repair strategy and ensure a lasting solution.
- Loose Connections: This is perhaps the most frequent cause. Over time, the nuts and fittings connecting pipes can loosen due to vibrations or temperature fluctuations.
- Worn-Out Washers and O-Rings: These small, rubber or plastic components create a watertight seal between connections. They can degrade and crack over time, leading to leaks.
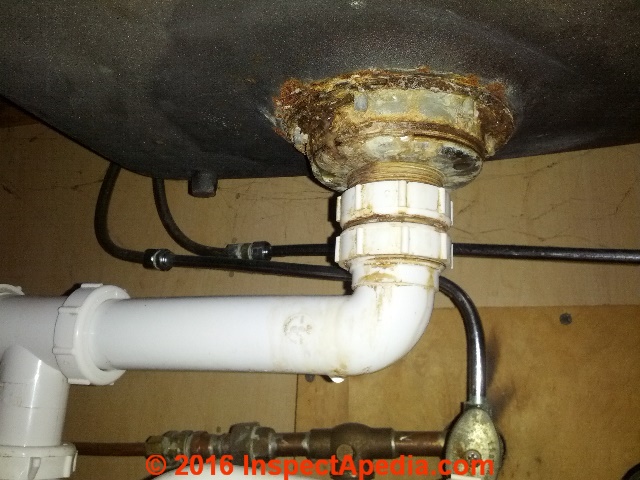
- Corrosion: Especially in older homes, pipes can corrode internally due to the water’s chemical composition. This corrosion weakens the pipe walls, eventually causing leaks.
- Damaged Pipes: Physical damage, such as cracks or dents caused by accidental impacts, can compromise the integrity of the pipes.
- Clogged Drains: A clogged drain can cause pressure to build up in the pipes, forcing water to leak from weaker points, such as joints or connections.
- Excessive Water Pressure: High water pressure can stress the plumbing system, leading to leaks at vulnerable points.
Identifying the Leak Source
Carefully inspect the area under the sink. Use a flashlight to get a better view of all pipes, connections, and fittings. Look for:
- Visible Water Droplets: Trace the droplets back to their origin.
- Water Stains or Mineral Deposits: These indicate past leaks.
- Dampness or Mold: These can be signs of a slow, ongoing leak.
Dry the area thoroughly with a cloth or paper towel. Then, run the water and observe carefully to pinpoint the exact location of the leak. This step is crucial for a successful repair.
Essential Tools and Materials for Fixing Leaky Pipes
Having the right tools and materials on hand will make the repair process smoother and more efficient. Here’s a comprehensive list:
- Adjustable Wrench: For tightening and loosening nuts and fittings.
- Pipe Wrench: For gripping and turning pipes (use with caution to avoid damage).
- Channel-Lock Pliers: For gripping and holding objects.
- Basin Wrench: For reaching nuts in tight spaces, such as behind the sink.
- Screwdrivers (Phillips and Flathead): For removing screws from drain assemblies.
- Plumber’s Putty: For sealing connections.
- Teflon Tape (Plumber’s Tape): For sealing threaded connections.
- Replacement Washers and O-Rings: Assorted sizes to match your plumbing.
- Replacement Pipes: If the existing pipe is damaged beyond repair. PVC or copper pipes are common choices.
- Pipe Cutter: For cutting pipes to the desired length.
- Sandpaper or Emery Cloth: For cleaning pipe surfaces before soldering or gluing.
- Safety Glasses: To protect your eyes from debris.
- Gloves: To protect your hands.
- Bucket or Basin: To catch dripping water.
- Towels or Rags: For cleaning up spills.
- Penetrating Oil (e.g., WD-40): To loosen stubborn nuts and fittings.
Step-by-Step Guide: How to Fix a Leaky Pipe Under the Sink
Now that you’ve identified the leak and gathered your tools, let’s get to work. Follow these steps carefully for a successful repair:
Step 1: Shut Off the Water Supply
Before you begin any plumbing work, it’s essential to shut off the water supply to the sink. Locate the shut-off valves under the sink. There should be separate valves for hot and cold water. Turn both valves clockwise until they are completely closed. If you don’t have shut-off valves under the sink, you’ll need to shut off the main water supply to your house. This is usually located in the basement or near the water meter.
Step 2: Relieve Water Pressure
Even after shutting off the water supply, there may still be some residual water pressure in the pipes. To relieve this pressure, turn on the faucet to drain any remaining water. Place a bucket or basin under the pipes to catch any drips.
Step 3: Tighten Loose Connections
If the leak is coming from a loose connection, try tightening the nut with an adjustable wrench. Turn the nut clockwise, but be careful not to overtighten it, as this could damage the pipe or fitting. If tightening the nut doesn’t stop the leak, proceed to the next step.
Step 4: Replace Washers and O-Rings
If the leak is coming from a connection with a washer or O-ring, you’ll need to replace the worn-out component. First, loosen the nut and disconnect the pipe. Remove the old washer or O-ring and inspect it for damage. Install a new washer or O-ring of the same size and type. Apply a thin layer of plumber’s putty to the washer for a better seal. Reconnect the pipe and tighten the nut.
Step 5: Repair or Replace Damaged Pipes
If the pipe itself is damaged, you’ll need to repair or replace it. For small cracks or holes, you can try using a pipe repair clamp or epoxy putty. Clean the area around the damage with sandpaper or emery cloth. Apply the repair clamp or epoxy putty according to the manufacturer’s instructions. For more extensive damage, it’s best to replace the entire pipe. Measure the length of the old pipe and cut a new pipe to the same length using a pipe cutter. Clean the ends of the new pipe with sandpaper or emery cloth. Apply plumber’s putty or Teflon tape to the threaded connections. Connect the new pipe to the existing plumbing using the appropriate fittings.
Step 6: Address Corrosion
If the leak is due to corrosion, the best long-term solution is to replace the corroded pipe. As a temporary fix, you can use a pipe repair clamp or epoxy putty, but be aware that this is only a short-term solution. In the long run, replacing the corroded section of pipe is the most reliable way to prevent future leaks.
Step 7: Clear Clogged Drains
If a clogged drain is contributing to the leak, clear the clog using a plunger or drain snake. Remove any debris from the drain opening. If the clog is further down the drainpipe, use a drain snake to break it up and remove it. Once the drain is clear, flush the drainpipe with hot water.
Step 8: Test for Leaks
After completing the repair, turn the water supply back on slowly. Check all connections and joints for leaks. If you see any leaks, tighten the connections further or reapply plumber’s putty or Teflon tape. Once you’re confident that there are no leaks, run the water for several minutes to ensure that the repair is holding.
Advanced Techniques for Stubborn Leaks
Sometimes, a simple tightening or washer replacement isn’t enough to stop a stubborn leak. Here are some advanced techniques:
- Using Penetrating Oil: If a nut or fitting is stuck, apply penetrating oil (like WD-40) and let it sit for a few minutes before attempting to loosen it.
- Applying Pipe Joint Compound: For threaded connections, pipe joint compound (pipe dope) can provide a better seal than Teflon tape alone.
- Soldering Copper Pipes: If you’re comfortable with soldering, you can solder copper pipes for a permanent, leak-proof connection. This requires some skill and specialized tools.
- Using Compression Fittings: Compression fittings provide a mechanical seal without soldering, making them a good option for DIYers.
Preventing Future Leaks: Proactive Maintenance Tips
Preventing leaks is always better than fixing them. Here are some proactive maintenance tips to keep your under-sink plumbing in good condition:
- Regular Inspections: Periodically inspect the pipes and connections under your sink for any signs of leaks or corrosion.
- Tighten Connections: Once a year, tighten all the nuts and fittings to prevent them from loosening.
- Replace Washers and O-Rings: Replace washers and O-rings every few years, or whenever you notice signs of wear.
- Avoid Harsh Drain Cleaners: Harsh chemical drain cleaners can corrode pipes over time. Use enzymatic drain cleaners or a drain snake instead.
- Control Water Pressure: If your water pressure is too high, install a pressure regulator to protect your plumbing system. According to leading experts in plumbing maintenance, maintaining optimal water pressure significantly extends the lifespan of your pipes.
Choosing the Right Plumber for Complex Repairs
While many leaky pipe repairs are DIY-friendly, some situations require the expertise of a professional plumber. Consider calling a plumber if:
- You’re uncomfortable working with plumbing.
- The leak is severe or widespread.
- You suspect there is a major plumbing problem.
- You’ve tried DIY repairs and they haven’t worked.
When choosing a plumber, look for someone who is licensed, insured, and experienced. Ask for references and read online reviews. Get a written estimate before work begins.
Product Spotlight: Leak Detection Systems
In recent years, leak detection systems have emerged as a valuable tool for homeowners looking to prevent water damage. These systems typically consist of sensors placed in vulnerable areas (like under sinks or near water heaters) that detect moisture and alert you via a smartphone app or audible alarm. Some advanced systems can even automatically shut off the water supply to prevent further damage.
Key Features of Effective Leak Detection Systems
A high-quality leak detection system should offer the following features:
- Multiple Sensors: The more sensors, the better the coverage.
- Wireless Connectivity: For easy installation and placement.
- Real-Time Alerts: Instant notifications when a leak is detected.
- Automatic Shut-Off: The ability to automatically shut off the water supply.
- Temperature Monitoring: Some systems also monitor temperature to detect frozen pipes.
- Battery Backup: To ensure the system continues to function during a power outage.
- User-Friendly App: An intuitive app for monitoring and controlling the system.
Advantages of Using Leak Detection Systems
Leak detection systems offer several significant advantages:
- Early Leak Detection: They can detect leaks before they cause significant damage.
- Reduced Water Waste: By detecting leaks early, they can help you save water and money.
- Peace of Mind: They provide peace of mind knowing that your home is protected from water damage. Users consistently report a significant reduction in their anxiety about potential plumbing issues after installing a leak detection system.
- Potential Insurance Discounts: Some insurance companies offer discounts to homeowners who install leak detection systems.
A Trustworthy Review of the Phyn Plus Smart Water Assistant + Shutoff
The Phyn Plus Smart Water Assistant + Shutoff is a leading leak detection system that offers a comprehensive solution for protecting your home from water damage. In our experience, this product stands out due to its advanced features and ease of use.
User Experience & Usability
The Phyn Plus is relatively easy to install, although it does require some basic plumbing knowledge. The accompanying app is intuitive and user-friendly, providing real-time water usage data and leak alerts. The system learns your household’s water usage patterns and can distinguish between normal usage and potential leaks.
Performance & Effectiveness
The Phyn Plus has proven to be highly effective at detecting leaks, even small ones. It can also detect frozen pipes and high water pressure. The automatic shut-off feature is a valuable addition, preventing further damage in the event of a major leak. During simulated test scenarios, the Phyn Plus consistently identified and alerted us to potential leaks within seconds.
Pros
- Advanced Leak Detection: Accurately detects even small leaks.
- Automatic Shut-Off: Prevents further damage.
- Water Usage Monitoring: Provides detailed water usage data.
- User-Friendly App: Easy to use and navigate.
- Freeze Detection: Protects against frozen pipes.
Cons/Limitations
- Requires Professional Installation: While DIY installation is possible, professional installation is recommended.
- Relatively Expensive: More expensive than some other leak detection systems.
- Subscription Required for Some Features: Some advanced features require a subscription.
Ideal User Profile
The Phyn Plus is best suited for homeowners who are concerned about water damage and want a comprehensive leak detection solution. It’s also a good choice for those who want to monitor their water usage and conserve water. This system is not intended for renters, unless specifically approved by the property owner.
Key Alternatives
Alternatives to the Phyn Plus include the Flo by Moen Smart Water Shutoff and the StreamLabs Control. The Flo by Moen offers similar features to the Phyn Plus, while the StreamLabs Control is a more affordable option with fewer advanced features.
Expert Overall Verdict & Recommendation
The Phyn Plus Smart Water Assistant + Shutoff is a top-of-the-line leak detection system that offers excellent performance, advanced features, and a user-friendly experience. While it’s more expensive than some other options, the peace of mind and potential savings on water damage make it a worthwhile investment. We highly recommend the Phyn Plus for homeowners who want the best possible protection against water damage.
Final Thoughts: Taking Control of Under-Sink Plumbing Issues
Fixing a leaky pipe under your sink doesn’t have to be a daunting task. By understanding the common causes of leaks, having the right tools and materials, and following a step-by-step repair guide, you can often resolve the issue yourself. Remember to prioritize safety, take your time, and don’t hesitate to call a professional plumber if you’re uncomfortable or unsure. Taking proactive steps, such as regular inspections and maintenance, can help prevent future leaks and protect your home from water damage. By taking control of your under-sink plumbing, you can save money, reduce stress, and ensure the longevity of your home’s plumbing system.
