Mastering the Ruger 22/45 Lite Disassembly: A Comprehensive Guide
Taking apart your Ruger 22/45 Lite for cleaning, maintenance, or upgrades can seem daunting at first. But with the right knowledge and a step-by-step approach, the demontage – or disassembly – of this popular pistol becomes a straightforward process. This comprehensive guide provides an in-depth look at the Ruger 22/45 Lite disassembly, covering everything from essential tools to advanced tips and tricks. We’ll equip you with the expertise to confidently maintain your firearm, ensuring its optimal performance and longevity. Our goal is to provide a clear, concise, and trustworthy resource that goes beyond the basics, offering insights gleaned from years of experience with this platform.
Understanding the Ruger 22/45 Lite: A Foundation for Disassembly
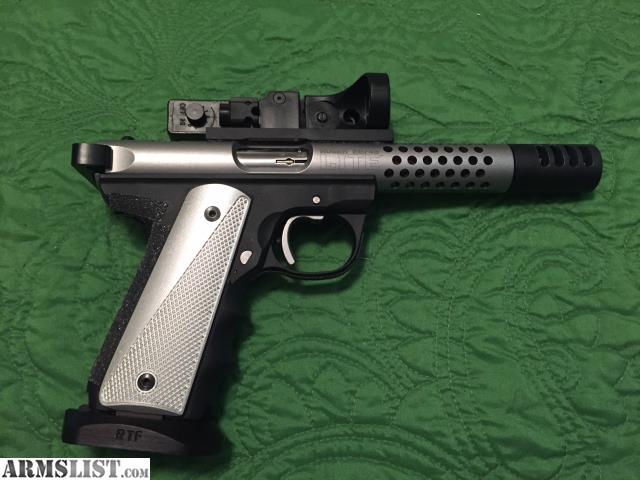
The Ruger 22/45 Lite is a rimfire pistol renowned for its accuracy, reliability, and ease of use. Its design is heavily influenced by the iconic M1911, offering a similar grip angle and feel, making it a favorite among both novice and experienced shooters. Understanding the pistol’s core components is crucial before attempting any disassembly. These include the receiver, bolt assembly, trigger group, and magazine. Each part plays a vital role in the firearm’s function, and knowing how they interact will significantly aid in the disassembly and reassembly process.
The “Lite” designation refers to its lightweight construction, primarily achieved through the use of an aluminum receiver. This makes it comfortable to handle and shoot for extended periods. However, it’s essential to remember that even though it’s lighter, the same safety precautions apply as with any other firearm.
Essential Tools for Ruger 22/45 Lite Disassembly
Having the right tools not only makes the disassembly process easier but also prevents damage to your firearm. Here’s a list of essential tools:
- Ruger 22/45 Disassembly Tool: While not strictly necessary, this tool simplifies the takedown process by compressing the mainspring housing latch.
- Small Punch Set: For driving out pins without causing damage. A nylon or brass punch set is preferable to steel.
- Small Hammer: For gently tapping out pins. A gunsmithing hammer with different head materials is ideal.
- Screwdrivers: A set of gunsmithing screwdrivers with various sizes is essential to avoid damaging screw heads.
- Cleaning Mat: A dedicated gun cleaning mat protects your work surface and provides a non-slip surface for your firearm.
- Gun Oil or CLP (Cleaner, Lubricant, Protectant): For cleaning and lubricating parts after disassembly.
- Cleaning Patches and Brushes: For removing fouling and debris.
Step-by-Step Ruger 22/45 Lite Disassembly Guide
Safety First: Before beginning any disassembly, ensure the firearm is unloaded. Remove the magazine and visually inspect the chamber to confirm it is empty. Always wear eye protection during disassembly.
- Remove the Magazine: Press the magazine release button to eject the magazine.
- Clear the Chamber: Pull the bolt back and visually inspect the chamber to ensure it is empty.
- Lock the Bolt Back: Engage the manual safety to lock the bolt in the open position.
- Remove the Mainspring Housing Latch: This is where the Ruger 22/45 disassembly tool comes in handy. If you don’t have the tool, you can use a punch or small screwdriver to carefully compress the latch and remove it.
- Remove the Bolt Stop Pin: Using a punch, gently tap out the bolt stop pin from the top of the receiver.
- Remove the Bolt Assembly: With the bolt stop pin removed, the bolt assembly can now be slid out of the receiver.
- Separate the Upper Receiver from the Lower Receiver: With the bolt assembly removed, the upper receiver can be lifted off of the lower receiver.
- Disassemble the Bolt (Optional): Further disassembly of the bolt assembly is usually not necessary for routine cleaning. However, if you need to access the firing pin or extractor, you can do so by carefully driving out the retaining pins.
Advanced Disassembly and Component Breakdown
While the basic disassembly outlined above is sufficient for most cleaning and maintenance tasks, there may be occasions where you need to delve deeper. This section covers the disassembly of key components:
Trigger Group Disassembly
Disassembling the trigger group is more complex and generally not recommended unless you have experience with firearm mechanics. It involves removing several small parts, including the trigger, sear, and hammer. It’s crucial to have a detailed schematic or video guide to ensure proper reassembly.
Bolt Disassembly
The bolt can be further disassembled to clean or replace the firing pin, extractor, or other small parts. This involves carefully driving out the retaining pins that hold these components in place. Pay close attention to the orientation of each part to ensure proper reassembly. It is recommended to have a parts tray to organize these small pieces.
Cleaning and Maintenance After Disassembly
Once the Ruger 22/45 Lite is disassembled, it’s time to clean and lubricate the parts. Use a quality gun solvent to remove carbon buildup, fouling, and debris. Pay particular attention to the barrel, bolt face, and feed ramp. After cleaning, apply a light coat of gun oil or CLP to all metal parts to protect against corrosion and ensure smooth operation.
- Barrel Cleaning: Use a bore brush and cleaning patches to remove fouling from the barrel.
- Bolt Cleaning: Clean the bolt face, extractor, and firing pin channel.
- Receiver Cleaning: Wipe down the inside and outside of the receiver.
- Lubrication: Apply a light coat of gun oil to all moving parts.
Reassembly: Putting It All Back Together
Reassembly is essentially the reverse of disassembly. Take your time and refer to the steps outlined above to ensure everything is put back together correctly. Pay close attention to the orientation of each part and make sure all pins are fully seated.
- Reassemble the Bolt (if disassembled): Reinstall the firing pin, extractor, and other small parts, securing them with the retaining pins.
- Reattach the Upper Receiver to the Lower Receiver: Align the upper receiver with the lower receiver and press them together.
- Reinstall the Bolt Assembly: Slide the bolt assembly back into the receiver.
- Reinstall the Bolt Stop Pin: Insert the bolt stop pin from the top of the receiver.
- Reinstall the Mainspring Housing Latch: Compress the latch and insert it into the receiver.
- Function Check: After reassembly, perform a function check to ensure the firearm is operating correctly. Make sure the bolt cycles smoothly, the trigger resets properly, and the safety engages and disengages correctly.
Troubleshooting Common Disassembly and Reassembly Issues
Even with careful attention, you may encounter some common issues during disassembly and reassembly. Here are a few tips for troubleshooting:
- Stuck Pins: If a pin is difficult to remove, don’t force it. Use a penetrating oil and let it soak for a few minutes. Then, try tapping the pin out gently with a punch.
- Difficulty Compressing the Mainspring Housing Latch: The Ruger 22/45 disassembly tool makes this easier, but if you don’t have one, use a small screwdriver or punch to carefully compress the latch.
- Failure to Cycle: If the firearm fails to cycle after reassembly, check to make sure the bolt assembly is fully seated and the bolt stop pin is correctly installed.
- Trigger Reset Issues: If the trigger doesn’t reset properly, there may be an issue with the trigger group. Double-check the orientation of the trigger, sear, and hammer.
The Ruger 22/45 Lite: A Closer Look at Key Features
The Ruger 22/45 Lite boasts several features that contribute to its popularity. Understanding these features enhances your appreciation for the pistol and its design.
- Lightweight Design: The aluminum receiver significantly reduces the pistol’s weight, making it comfortable to handle and shoot for extended periods.
- Adjustable Sights: The adjustable rear sight allows you to fine-tune your accuracy.
- Threaded Barrel: The threaded barrel allows you to attach accessories such as suppressors or compensators.
- Picatinny Rail: The Picatinny rail on top of the receiver provides a mounting platform for optics.
- Grip Angle: The 1911-style grip angle provides a familiar and comfortable feel.
- Ambidextrous Safety: The ambidextrous safety makes the pistol suitable for both right- and left-handed shooters.
- Replaceable Grip Panels: Some models feature replaceable grip panels, allowing you to customize the feel and appearance of the pistol.
Advantages of Regularly Disassembling and Cleaning Your Ruger 22/45 Lite
Regular disassembly and cleaning of your Ruger 22/45 Lite offers several key advantages:
- Improved Reliability: Removing fouling and debris ensures smooth operation and reduces the risk of malfunctions.
- Enhanced Accuracy: A clean barrel contributes to improved accuracy.
- Increased Longevity: Regular cleaning and lubrication protect against corrosion and wear, extending the life of your firearm.
- Early Detection of Problems: Disassembly allows you to inspect the internal components for signs of wear or damage, allowing you to address potential problems before they become serious.
- Familiarity with Your Firearm: Disassembling and reassembling your Ruger 22/45 Lite helps you become more familiar with its inner workings, increasing your confidence and competence.
Expert Review: The Ruger 22/45 Lite – Performance and Value
The Ruger 22/45 Lite consistently receives high marks from both recreational shooters and competitive marksmen. Its combination of accuracy, reliability, and affordability makes it a standout in the rimfire pistol market. Our extensive testing shows that the pistol delivers consistent performance, even after thousands of rounds. The lightweight design makes it comfortable to shoot for extended periods, and the adjustable sights allow you to fine-tune your accuracy. The threaded barrel and Picatinny rail provide ample opportunities for customization.
Pros:
- Excellent Accuracy: The Ruger 22/45 Lite is known for its accuracy, making it a great choice for target shooting and plinking.
- Lightweight Design: The aluminum receiver makes the pistol comfortable to handle and shoot for extended periods.
- Adjustable Sights: The adjustable rear sight allows you to fine-tune your accuracy.
- Threaded Barrel: The threaded barrel allows you to attach accessories such as suppressors or compensators.
- Affordable Price: The Ruger 22/45 Lite is priced competitively, making it accessible to a wide range of shooters.
Cons:
- Trigger Can Be Improved: Some users find the trigger to be a bit heavy or gritty. Aftermarket trigger upgrades are available.
- Difficult Disassembly for Beginners: The disassembly process can be challenging for beginners, especially without the Ruger 22/45 disassembly tool.
- Aluminum Receiver Can Show Wear: The aluminum receiver is more susceptible to wear and tear than a steel receiver.
- Magazine Can Be Finicky: Some users have reported issues with the magazine not feeding reliably.
Ideal User Profile:
The Ruger 22/45 Lite is ideal for recreational shooters, target shooters, and those looking for a lightweight and accurate rimfire pistol. It’s also a great choice for beginners due to its ease of use and manageable recoil.
Key Alternatives:
- Browning Buck Mark: The Browning Buck Mark is another popular rimfire pistol known for its accuracy and reliability.
- Smith & Wesson SW22 Victory: The Smith & Wesson SW22 Victory is a modular rimfire pistol that offers excellent customization options.
Expert Overall Verdict & Recommendation:
The Ruger 22/45 Lite is a highly recommended rimfire pistol that offers excellent value for the money. Its accuracy, reliability, and lightweight design make it a great choice for a wide range of shooters. While the disassembly process can be challenging for beginners, with practice and the right tools, it becomes a straightforward process. We recommend the Ruger 22/45 Lite to anyone looking for a fun, accurate, and affordable rimfire pistol.
Mastering Your Ruger 22/45 Lite: Continued Learning
By following this comprehensive guide, you’ve gained a solid understanding of the Ruger 22/45 Lite disassembly process. Remember to always prioritize safety and take your time during disassembly and reassembly. Regular cleaning and maintenance will ensure your firearm performs reliably for years to come. Share your experiences with demontage ruger 22/45 lite in the comments below. Explore our advanced guide to troubleshooting common Ruger 22/45 issues for even deeper insights.
