Stop the Drip: Your Ultimate Guide to Fixing a Kitchen Sink Leak
A kitchen sink leak is more than just an annoyance; it’s a potential source of water damage, wasted money, and endless frustration. Whether it’s a slow drip or a steady stream, understanding the cause and knowing how to fix a kitchen sink leak is a crucial skill for any homeowner. This comprehensive guide provides you with the expert knowledge and step-by-step instructions to diagnose and resolve common kitchen sink leak issues, saving you time, money, and the headache of dealing with a costly plumbing repair. We’ll cover everything from identifying the source of the leak to selecting the right tools and materials, ensuring a successful and long-lasting repair.
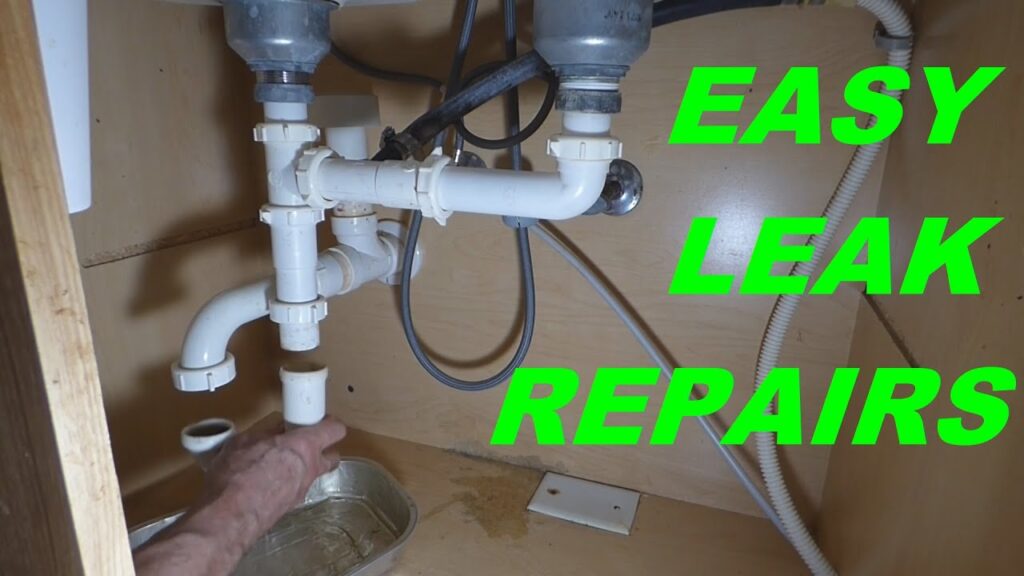
Understanding the Anatomy of a Kitchen Sink and Common Leak Sources
Before you can tackle a kitchen sink leak, it’s essential to understand the different components of your sink and where leaks are most likely to occur. Familiarizing yourself with these parts will make the diagnostic process much easier.
- Faucet Base: The point where the faucet connects to the sink. Leaks here often involve worn-out O-rings or loose connections.
- Faucet Spout: The curved or angled part of the faucet where water exits. Leaks could indicate issues within the faucet body.
- Supply Lines: Flexible tubes connecting the shut-off valves to the faucet. These can corrode or develop leaks over time.
- Shut-Off Valves: Located under the sink, these control the water supply to the faucet. Leaks around the valve stem or connections are common.
- Sink Drain: The opening in the sink basin where water drains. Leaks frequently occur due to loose connections or deteriorated putty.
- P-Trap: The curved pipe under the sink that traps debris and prevents sewer gases from entering your home. Leaks can arise from loose connections or corrosion.
- Drain Tailpiece: The pipe connecting the sink drain to the P-trap. Leaks often occur at the slip-joint connections.
- Garbage Disposal (if applicable): The appliance attached to the sink drain for grinding food waste. Leaks can originate from the disposal itself or its connections.
Pinpointing the exact location of the leak is the first crucial step in any repair. Run the water and carefully inspect each of these areas for signs of moisture. Don’t forget to check behind the sink and under the cabinet for any hidden drips.
Essential Tools and Materials for Kitchen Sink Leak Repair
Having the right tools and materials on hand will make the repair process smoother and more efficient. Here’s a list of essential items you’ll likely need:
- Basin Wrench: For loosening and tightening nuts in hard-to-reach places, especially around the faucet.
- Adjustable Wrench: For general tightening and loosening of nuts and bolts.
- Pliers (Slip-Joint and Regular): For gripping and manipulating parts.
- Screwdrivers (Phillips and Flathead): For removing and installing screws.
- Plumber’s Putty: For sealing around drains and faucets.
- Teflon Tape: For sealing threaded connections.
- Replacement Parts: O-rings, washers, cartridges, supply lines, etc., as needed.
- Bucket: To catch dripping water.
- Towels or Rags: For cleaning up spills.
- Penetrating Oil: To help loosen stubborn nuts and bolts.
- Safety Glasses: To protect your eyes.
- Gloves: To protect your hands.
Before starting any repair, always turn off the water supply to the sink using the shut-off valves located underneath. This will prevent any unwanted flooding.
Diagnosing the Cause: Common Types of Kitchen Sink Leaks
Identifying the source of your kitchen sink leak is critical for a successful repair. Here’s a breakdown of some common types of leaks and their likely causes:
- Faucet Leaks:
- Dripping Faucet: Often caused by a worn-out washer, O-ring, or cartridge inside the faucet.
- Leak at the Faucet Base: Usually due to a loose connection or deteriorated O-ring.
- Leak Under the Sink (near the faucet): Could be a loose supply line connection or a leak in the faucet body itself.
- Drain Leaks:
- Leak at the Sink Drain: Typically caused by deteriorated plumber’s putty or a loose connection.
- Leak at the P-Trap: Often due to loose slip-joint connections.
- Leak at the Drain Tailpiece: Similar to the P-trap, loose slip-joint connections are the usual culprit.
- Supply Line Leaks:
- Leak at the Connection: Usually due to a loose connection or damaged compression ring.
- Leak Along the Hose: Indicates a crack or rupture in the supply line itself.
- Garbage Disposal Leaks:
- Leak at the Mounting Ring: Often caused by a loose connection or worn-out gasket.
- Leak from the Disposal Body: Could indicate internal damage or corrosion.
- Leak at the Dishwasher Connection: Usually due to a loose hose clamp or damaged hose.
Once you’ve identified the type of leak, you can proceed with the appropriate repair.
Step-by-Step Guide to Fixing Common Kitchen Sink Leaks
Now that you’ve diagnosed the leak and gathered your tools, let’s walk through the repair process for some common kitchen sink leak scenarios.
Fixing a Dripping Faucet
- Turn off the water supply: Locate the shut-off valves under the sink and turn them off.
- Identify the faucet type: Determine whether you have a compression, cartridge, ball, or ceramic disc faucet.
- Disassemble the faucet: Carefully remove the handle, spout, and any other necessary components to access the worn-out part. This often involves removing decorative caps and loosening screws.
- Replace the worn part: Depending on the faucet type, this could be a washer, O-ring, or cartridge. Take the old part with you to the hardware store to ensure you get the correct replacement.
- Reassemble the faucet: Carefully reassemble the faucet in the reverse order of disassembly.
- Turn on the water supply: Slowly turn the shut-off valves back on and check for leaks.
Repairing a Leak at the Sink Drain
- Turn off the water supply: Locate the shut-off valves under the sink and turn them off.
- Remove the drain flange: Use a wrench to loosen the nut holding the drain flange in place.
- Clean the sink surface: Remove any old plumber’s putty from the sink surface.
- Apply new plumber’s putty: Roll a rope of plumber’s putty and press it around the underside of the drain flange.
- Reinstall the drain flange: Place the drain flange back into the sink drain opening and tighten the nut.
- Remove excess putty: Clean up any excess putty that squeezes out.
- Turn on the water supply: Slowly turn the shut-off valves back on and check for leaks.
Tightening a Loose P-Trap Connection
- Place a bucket under the P-trap: To catch any water that may be trapped inside.
- Loosen the slip-joint nuts: Use pliers to loosen the slip-joint nuts on either side of the P-trap.
- Inspect the washers: Check the washers inside the slip-joint connections for damage or wear. Replace them if necessary.
- Realign the pipes: Make sure the pipes are properly aligned and seated in the slip-joint connections.
- Tighten the slip-joint nuts: Hand-tighten the slip-joint nuts, then use pliers to give them a snug turn. Be careful not to overtighten.
- Turn on the water supply: Slowly turn the shut-off valves back on and check for leaks.
When to Call a Plumber: Recognizing the Limits of DIY Repair
While many kitchen sink leak repairs are manageable for homeowners, there are situations where calling a professional plumber is the best course of action. Attempting to fix complex plumbing problems without the necessary expertise can lead to further damage and costly repairs. Here are some scenarios where you should consider calling a plumber:
- Extensive Water Damage: If the leak has caused significant water damage to your cabinets, flooring, or walls, it’s best to consult a plumber and a water damage restoration specialist.
- Hidden Leaks: If you suspect a leak behind walls or under the floor, a plumber can use specialized equipment to locate and repair the problem.
- Persistent Leaks: If you’ve tried multiple DIY repairs and the leak persists, it may indicate a more complex underlying issue.
- Frozen Pipes: If your pipes have frozen and burst, it’s crucial to call a plumber immediately to prevent further damage.
- Sewer Line Issues: If you suspect a problem with your sewer line, such as a blockage or a leak, it’s essential to call a licensed plumber.
- Lack of Experience or Confidence: If you’re uncomfortable working with plumbing or lack the necessary skills, it’s always best to err on the side of caution and call a professional.
Remember, a plumber has the training, experience, and tools to diagnose and repair complex plumbing problems safely and effectively. Investing in professional help can save you time, money, and the stress of dealing with a plumbing emergency.
Preventing Future Kitchen Sink Leaks: Proactive Maintenance Tips
Preventing kitchen sink leaks is far easier than dealing with the aftermath of water damage. Regular maintenance and proactive measures can significantly reduce the risk of leaks and extend the lifespan of your plumbing system. Here are some essential tips to keep your kitchen sink in top condition:
- Regularly Inspect Plumbing: Periodically check under your sink for any signs of leaks, corrosion, or damage. Pay close attention to connections, supply lines, and the P-trap.
- Tighten Loose Connections: Use a wrench to gently tighten any loose connections you find. Be careful not to overtighten, as this can damage the fittings.
- Replace Worn Parts: Replace worn-out washers, O-rings, and cartridges in your faucets and valves. These parts can deteriorate over time and cause leaks.
- Avoid Harsh Chemicals: Avoid pouring harsh chemicals down your drain, as they can corrode pipes and cause leaks.
- Flush with Hot Water: Periodically flush your drain with hot water to prevent grease and debris from building up.
- Use a Drain Strainer: Use a drain strainer to catch food particles and other debris that can clog your drain and cause leaks.
- Insulate Pipes: Insulate your pipes to prevent them from freezing and bursting during cold weather.
- Consider Professional Inspections: Schedule regular plumbing inspections with a qualified plumber to identify and address potential problems before they escalate.
The Smart Choice for a Dry Kitchen
Dealing with a kitchen sink leak can be frustrating, but with the right knowledge and tools, many repairs are within reach for the average homeowner. By understanding the anatomy of your sink, diagnosing the source of the leak, and following the step-by-step instructions outlined in this guide, you can effectively tackle common leak issues and save yourself time and money. However, it’s crucial to recognize the limits of DIY repair and to call a professional plumber when necessary. Proactive maintenance and regular inspections are key to preventing future leaks and keeping your kitchen plumbing system in top condition. Share your experiences with kitchen sink leaks in the comments below, or explore our advanced guide to plumbing maintenance for more in-depth information.
