Transform Your Kitchen: Expert Guide to Refacing or Painting Kitchen Cabinets from Brown to White Lacquer
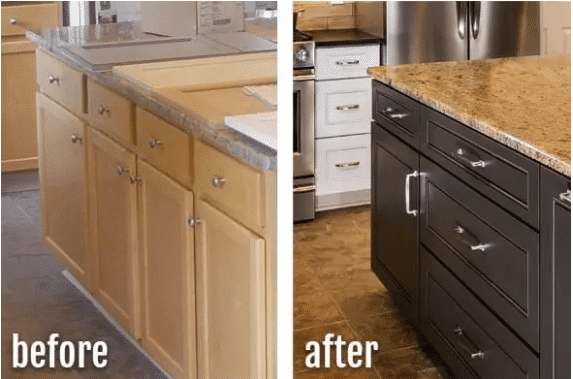
Dreaming of a bright, modern kitchen but dreading the cost and disruption of a full remodel? Refacing or painting kitchen cabinets from brown to white lacquer is a transformative project that can dramatically update your space without breaking the bank. This comprehensive guide will walk you through every step of the process, from assessing your existing cabinets to achieving a flawless, professional-looking lacquer finish. We’ll delve into the nuances of both refacing and painting, providing expert insights and practical tips to ensure a stunning, long-lasting result. Whether you’re a seasoned DIYer or a first-time homeowner, this guide will equip you with the knowledge and confidence to tackle this rewarding project.
Understanding Your Options: Refacing vs. Painting
Before diving in, it’s crucial to understand the difference between refacing and painting your kitchen cabinets. While both methods aim to refresh the look of your cabinets, they involve different levels of effort, cost, and ultimately, results.
Painting: This involves cleaning, prepping, and applying a new coat of paint to your existing cabinet doors and frames. It’s a cost-effective option when your cabinet boxes are structurally sound and you’re happy with the existing door style. Painting allows for a significant color change, like transitioning from a dark brown to a bright white lacquer.
Refacing: This is a more involved process that involves replacing the existing cabinet doors and drawer fronts with new ones, while also applying a matching veneer to the exposed cabinet boxes. Refacing is ideal when you want to change the style of your doors (e.g., from a raised panel to a shaker style) or if your existing doors are damaged beyond repair. It offers a more dramatic transformation than painting, but it also comes at a higher cost.
Why Choose White Lacquer for Your Kitchen Cabinets?
White lacquer has become an increasingly popular choice for kitchen cabinets, and for good reason. It offers a multitude of benefits that contribute to a modern, stylish, and functional kitchen space.
- Timeless Appeal: White is a classic color that never goes out of style. It creates a clean and sophisticated look that complements any kitchen design.
- Bright and Airy: White reflects light, making your kitchen feel brighter, more spacious, and more inviting. This is especially beneficial in smaller kitchens or those with limited natural light.
- Versatility: White cabinets pair well with a wide range of countertop materials, backsplash designs, and hardware finishes, giving you endless design possibilities.
- Easy to Clean: Lacquer finishes are durable and easy to clean, making them ideal for a high-traffic area like the kitchen. Spills and splatters can be easily wiped away with a damp cloth.
- Modern Aesthetic: White lacquer provides a smooth, sleek, and contemporary look that is highly sought after in modern kitchen design.
Essential Tools and Materials for Painting Kitchen Cabinets
Proper preparation is key to achieving a professional-looking paint job. Here’s a comprehensive list of the tools and materials you’ll need:
- Cleaning Supplies: Degreaser, TSP (trisodium phosphate) cleaner, sponges, cloths, and buckets.
- Sanding Supplies: Sandpaper (various grits, from 120 to 320), sanding block, and a tack cloth.
- Priming Supplies: High-quality primer (specifically designed for cabinets), paintbrushes, rollers, and a paint tray.
- Painting Supplies: White lacquer paint (specifically formulated for cabinets), paintbrushes (angled brush for detail work), rollers (foam rollers for a smooth finish), paint sprayer (optional), and a paint tray.
- Safety Gear: Safety glasses, gloves, and a respirator or dust mask.
- Other Essentials: Painter’s tape, drop cloths, screwdriver, drill, wood filler (if needed), and a level.
Step-by-Step Guide to Painting Kitchen Cabinets with White Lacquer
Follow these steps carefully to achieve a flawless, professional-looking white lacquer finish on your kitchen cabinets:
- Remove Hardware: Carefully remove all cabinet doors, drawers, knobs, pulls, and hinges. Label each door and drawer to ensure proper reinstallation.
- Thoroughly Clean: Clean all cabinet surfaces with a degreaser to remove grease and grime. Follow with a TSP cleaner to remove any remaining residue. Rinse thoroughly with clean water and allow to dry completely.
- Sand Surfaces: Lightly sand all surfaces with 120-grit sandpaper to create a slightly rough surface for the primer to adhere to. Use a sanding block to ensure even sanding. Follow with 220-grit sandpaper to smooth out any rough spots. Wipe away sanding dust with a tack cloth.
- Apply Primer: Apply a thin, even coat of high-quality primer to all cabinet surfaces. Use a brush for corners and detailed areas, and a roller for larger surfaces. Allow the primer to dry completely according to the manufacturer’s instructions.
- Lightly Sand Again: Once the primer is dry, lightly sand the surfaces with 320-grit sandpaper to smooth out any imperfections. Wipe away sanding dust with a tack cloth.
- Apply Lacquer Paint: Apply a thin, even coat of white lacquer paint to all cabinet surfaces. Use a brush for corners and detailed areas, and a roller or paint sprayer for larger surfaces. Allow the paint to dry completely according to the manufacturer’s instructions.
- Apply Second Coat (if needed): If necessary, apply a second coat of lacquer paint to achieve full coverage and a uniform finish. Allow the paint to dry completely according to the manufacturer’s instructions.
- Reinstall Hardware: Once the paint is completely dry, carefully reinstall the hinges, knobs, pulls, and doors.
Refacing Kitchen Cabinets: A Detailed Overview
Refacing is a more complex project than painting, but it can deliver a more dramatic transformation. Here’s a detailed overview of the refacing process:
- Measure and Order New Doors and Veneer: Accurately measure all cabinet doors and drawer fronts to ensure a perfect fit for the new doors. Order new doors and veneer in your desired style and finish.
- Prepare Cabinet Boxes: Clean and lightly sand the exposed cabinet boxes to prepare them for the veneer.
- Apply Veneer: Apply the veneer to the cabinet boxes using contact cement or a similar adhesive. Follow the manufacturer’s instructions carefully.
- Install New Doors and Hardware: Install the new cabinet doors and drawer fronts using new hinges and hardware.
Choosing the Right White Lacquer Paint for Kitchen Cabinets
Selecting the right lacquer paint is critical for achieving a durable and beautiful finish. Here are some factors to consider:
- Durability: Choose a lacquer paint that is specifically formulated for cabinets and is resistant to scratches, chips, and stains.
- Finish: White lacquer is available in various sheens, from matte to high-gloss. Consider the overall aesthetic you’re trying to achieve when selecting a sheen. A semi-gloss or gloss finish is often recommended for kitchen cabinets due to its durability and ease of cleaning.
- Application Method: Some lacquer paints are designed for brush and roller application, while others are best applied with a paint sprayer. Choose a paint that is compatible with your preferred application method.
- VOC Content: Consider the VOC (volatile organic compound) content of the paint. Low-VOC or zero-VOC paints are more environmentally friendly and have less odor.
Troubleshooting Common Painting Problems
Even with careful preparation, you may encounter some common painting problems. Here’s how to troubleshoot them:
- Brush Strokes: Use a high-quality brush and apply thin, even coats of paint. Consider using a paint conditioner to improve the flow of the paint.
- Roller Marks: Use a foam roller designed for smooth finishes. Avoid pressing too hard on the roller.
- Paint Runs: Apply thin coats of paint and avoid over-saturating the brush or roller.
- Uneven Coverage: Apply multiple coats of paint to achieve full coverage.
- Bubbling: Ensure the surface is clean and dry before painting. Avoid painting in direct sunlight or high humidity.
The Lasting Beauty of Refaced or Painted Kitchen Cabinets
Refacing or painting your kitchen cabinets from brown to white lacquer is a significant investment in your home’s value and your personal enjoyment of the space. By following these expert tips and taking your time, you can achieve a stunning, professional-looking result that will transform your kitchen into the heart of your home. Remember to prioritize preparation, use high-quality materials, and don’t be afraid to seek professional help if needed. Updating your kitchen cabinets is not just about aesthetics; it’s about creating a space that is both functional and beautiful for years to come. Explore the possibilities, embrace the process, and enjoy the transformation!
